

How to Unlock Your Website’s Potential and Increase Load Speed by Nearly 30 Percent
This YouMoz entry was submitted by one of our community members. The author’s views are entirely their own (excluding an unlikely case of hypnosis) and may not reflect the views of Moz.
Having a website that loads quickly is critical for your business. Optimizing load speed is more than just a technical issue. It has a direct impact on visits to your website and key conversions.
Fast and fluid browsing encourage users to spend more time on your site. In other words, it increases the possibility of them buying your products or hiring your services.
In this post, I’m going to explain how to fine tune your WordPress site to ensure it loads at lightning speed.
Using the instructions I provide below, I've seen websites increase their load speed by up to 30%.

The first thing you need to do is to measure how long your site currently takes to load.
This will enable you to compare how the speed has changed after applying the optimization tips I give you here.
You can test your loading speed using Pingdom.
Take a look; we have run a test on nosolocodigo.com, and this is the result obtained after 60 loads:

I’m sure that the result you get for your website can also be improved considerably. Follow these steps to optimize your website for really fast loading:
Step #1: Install and set up WP Super Cache
WP Super cache is a powerful plugin for WordPress used to create a file based cache.
What does this mean?
It means that memory storage such as Memcache is not used, but a copy of the whole page is generated in a static HTML file. The plugin takes care of showing the website from this copy, rather than reloading the page for each visit.
The savings on server resources are substantial. (The combination of SSD disks with WP Super Cache will make your site run even faster.)
The first thing you need to do is install the plugin.
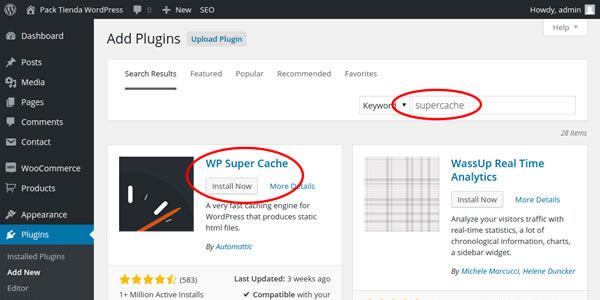
Visit Plugins – Add New.

Enter the search term "SuperCache" and click on Install Now. Once installation is complete, click on Activate Plugin.
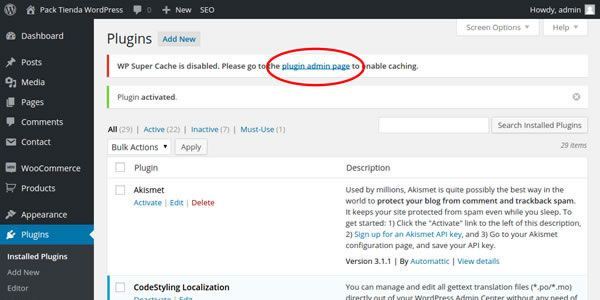
A red window will open to remind you that the cache is disabled, and that you must enable it from the plugin manager. Click on the link and activate Caching On. Then click on Update Status (on the management page) to enable the cache.
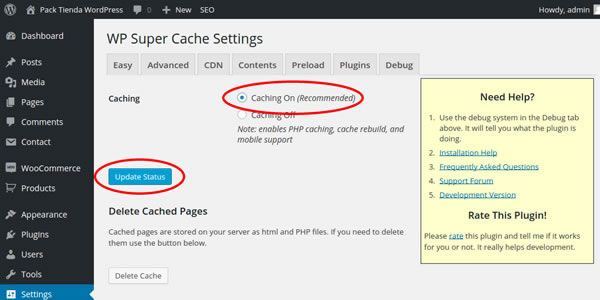
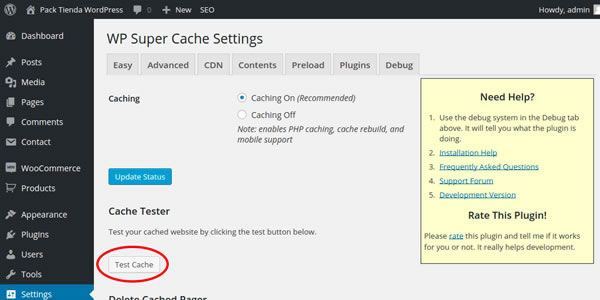
Go to Settings – WP Super Cache - Easy, and click on Test Cache to check that everything is in order.
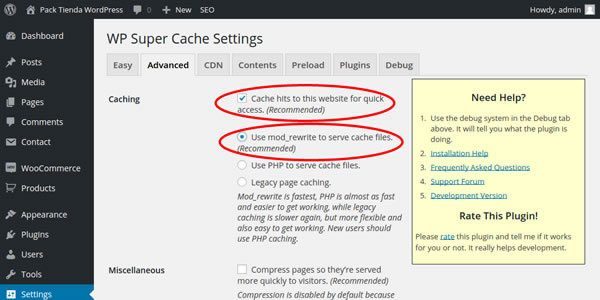
Go to Advanced and mark the check box that says Cache hits to this website for quick access.
It is followed by three options. To serve cache files, you should now enable Use mod_rewrite to serve cache files to serve cache files.
Update the options again, then scroll down and click on Update Status.
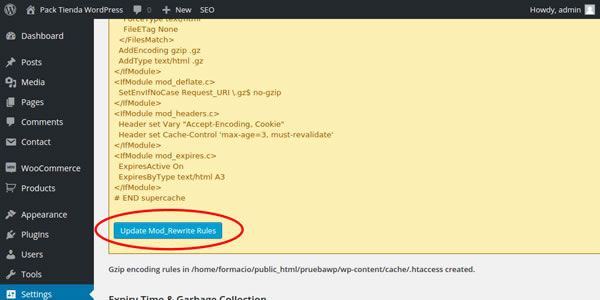
You will see a notice saying “Rewrite rules must be updated.” Scroll down, and you will see a yellow sign with the Mod_Rewrite Rules and a button saying Update Mod_Rewrite Rules. Click on the button to update the Mod_Rewrite Rules on your .htaccess file.
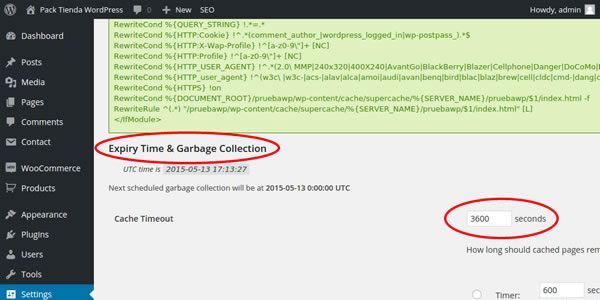
Now you need to set up “trash” collection at 1800 second intervals (30 mins) or 3600 second intervals (1 hour). Access the section “Expiry Time & Garbage Collection” and set the Cache Timeout to 3600 seconds.
Finally, go to Settings – WP Super Cache - Advanced, and enable the option "Compress pages so they’re served more quickly to visitors."
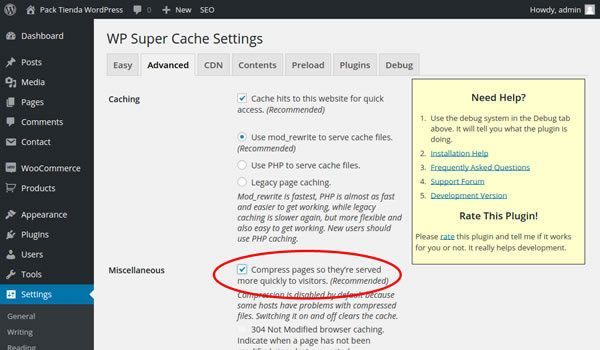
What you are doing now is enabling GZip to compress all content. This allows the page to load quicker and saves bandwidth.
Step #2: Create a subdomain for static content
If you measure loading time as you go along, you can see that your site is already improving.
But there is still more you can do, like creating a subdomain under our main domain. You will use this to serve static content (e.g., JavaScript, CSS files and images) for your site.
The advantage of using this subdomain for this purpose is that it will allow this type of content to be downloaded with parallel connections, thus making them faster.
To get started, create a subdomain on your hosting control panel and add it to the website you are optimizing. In the case of cpanel, this must be done using the section Domains > Subdomains.

It is really important that the Document Root of the “static content” subdomain links to /public_html, NOT to /public_html/static; otherwise, no static content will load and the page will not be viewed correctly.
Next, go to your WordPress control panel and follow these steps:
- Go to Performance > General Settings
- Under the section “CDN” enable the “Generic Mirror” CDN function
- Next, go to Performance > CDN
- Enable all the options under the “General” section and indicate the subdomain you set up in under “Configuration”
Important: Only apply these changes if you are completely sure the subdomain “static.domain.com” is working correctly and links to your website root. If not, the CSS/Javascript files and images will not work on your site. Do not apply these changes for the first time on a production server. First do it on a test server.
- Go to Settings – WP Super Cache - CDN and enable the option Enable CDN Support.
- Next, in the Off-site URL field, enter the subdomain you have just created. In my case, this would be http://estaticos.nosolocodigo.com. Oh, and very important to remember: DO NOT include the final forward slash ( / ). Under Additional CNAMES, you can simply enter the same value.
- Finally, tick the option Skip https URLs to avoid "mixed content" errors, then save your changes.

At this point, your static files will be loaded via the subdomain you have set up, and this will improve the speed of your website.
Step #3: Quickly cure lazy loading
Another trick I want to explain involves installing a plugin that ensures images are only downloaded as they appear on screen. This prevents the unnecessary downloading of images the user cannot see.
The images are downloaded as the user scrolls up and down your website. You can download the plugin here.
Once installed and enabled, you're done. It works automatically.
Step #4: Check the results
Once you have made all these improvements, repeat the speed test. As you can see, in the case of nosolocodigo.com, we have managed to improve speed by 28%.

There are a few other elements you might also consider:
Step #5: Automatically optimize your website images
It is quite common for websites to have images that take up more space than necessary. These images take longer to load and fill up hosting space.
As I said before, one option is to adjust image size before uploading them. However, you also have the option of automatic optimization of the image size using the EWWW Image Optimizer plugin. Once installed and enabled, this plugin automatically optimizes images as you upload them to WordPress. This reduces the disk space taken up by each image, without any loss of quality.
If you want to optimize the images already uploaded to your site, go to Settings - EWWW Image Optimizer and click on the bulk optimize link. Here all you have to do is click on Start, and the plugin will complete the image optimization for you.
Step #6: Defer JavaScript code loading
When the JavaScript code is loaded in the page header, this code must finish loading before the actual visible content of the page can be loaded. This causes a delay in showing visible content.
WordPress works this way by default, but there are plugins for deferring JavaScript execution, leaving it until the end.
One option is the JavaScript to Footer plugin, which allows you to make this change automatically. Simply install and enable the plugin for it to start working. (There is no need to perform any other setup actions.)
WARNING – Deferred loading of JavaScript can cause errors on the page, particularly in the sections that use this code: dropdown menus, image galleries, image zoom effects, accordions, etc.
It is therefore important that after using a plugin of this type, you check that your website loads normally. If it doesn't load normally, it is better not to use the JavaScript deferral plugin.
Other key recommendations
For the best results, I recommend working through the list below so that you have a solid starting point. When you are working from a solid starting point, any improvements you make to your website will have a much bigger impact on its performance.
- Make sure that your hosting service is fast.
- Uninstall or disable any plugins you don’t use. This will prevent unnecessary delays in your website download speed.
- Are you getting a lot of spam? Wipe it out with Akismet.
- Contract hosting services in the country where your target audience lives. It is important to host your site close to the majority of your users, as this vastly improves response times. You will also avoid many connectivity issues.
- Is your operating system optimized for shared hosting? One of the common problems with shared hosting occurs when one of the users on your service receives a lot of visits in one go, or simply suffers programing issues, you also suffer the consequences. To prevent this, it is important to use systems to keep resources separate. This ensures that there is always a minimum amount of resources available for each user. The CloudLinux system allows each client to have a separate compartment on the server, isolating each account using the same principles as those used in a LVE (Lightweight Virtual Environment).
- On the server, SSD hard drives are best. Solid state drives have evolved a great deal and are reliable enough to be used on production servers. There is a huge difference in performance compared with older hard drives. MySQL really flies on servers with SSD disks. This is particularly important when using content managers such as WordPress, which make extensive use of MySQL. It is true that SSDs are more expensive and have less storage space, but the improved performance and speed is really clear and it is well worth it.
- Nginx reverse proxy speeds up the download of static content. Apache is a very reliable web server with loads of possibilities. It is a standard server. However, there are other servers, like Nginx, that are much lighter and faster. A good option is to have Nginx as a reverse proxy, which takes care of dealing with static content (CSS, images, Javascript, text, etc.). The Nginx response time is much faster than Apache, and server performance improves when using Nginx.
- It is very important for all images uploaded to your site to be optimized. If you upload images straight from your camera, or as they are sent to you, they will probably take up twice as much space as they should. Image on a website need to be optimized as much as possible to ensure fast download. This process tends to be quite tedious. Also, as you and your collaborators continue to upload new content, it is difficult to keep track of whether everyone is uploading images correctly.
- Safe hosting with a firewall is a must. Although they seem to be two different things, safe hosting and firewalls are quite connected. Having secure hosting that can remove spam traffic or denial of services attacks makes everything run more smoothly. If you are a victim of a DDoS attack on your WordPress or Joomla administration and are not protected, your web will probably end up loading slowly as it cannot process so many login attempts.
I realize I've thrown quite a lot of information in your direction. However, nothing I've described takes a great degree of skill or expertise to implement. I'm convinced that by making the improvements outlined in this post, your website can see vast improvements in performance.
I'm eager to read your feedback in the comments below.


Comments
Please keep your comments TAGFEE by following the community etiquette
Comments are closed. Got a burning question? Head to our Q&A section to start a new conversation.